It's been a hot spicy minute. I used to write words as well as just unceremoniously shove pictures down the gaping maw of the internet. As an old tribute to the way things used to be when all was rosy and bright before the world broke me against its knee I have stumbled back to draft this report of the build and battle of my first beetle in many years.
Grab a drink, pack supplies and get used to run on sentences because Harry is writing again.
The robotic darling of my fleet and perhaps the nicest shaped thing I've made has been Loader, a 150g tracked antweight made out of spit, hope and silicone hairbands about 3 years ago. From a visually uneasy beginning it blossomed into a really neat little package that is still being press ganged into service today. Hell, if you feel silly enough you can download your own and try and find your local equivalent of a Boots to get the tracks.
It sort of kickstarted me building small things after a glut a few years back and I've settled back into a normal ebb and flow with antweight inspiration since, sometimes there's a flurry of activity (namely a new robot a week for a month) but there's never a total dry spell. Because it was such a good catalyst for Making Robots Happen before I elected to try and tread the same ground again but with beetles.
So, beetles! Now there is a weight class I haven't mentioned in a long bloody time. Despite being around at, and being fairly involved in the inception of the class in the UK I fell out of love with it more or less exactly as it found solid footing and Got Good. Maybe if it dies off as soon as I come back to it there can be causation/correlation arguments made. Time will tell I'm sure.
Looking back I can say without too much arrogance that I made some nice things! And sold them! And they did well in competition! And I bought them back! And did absolutely nothing with them so sold them again! Rinse and repeat for a minute there. I had some rough ideas for end results but never quite got the steam up to follow through. Funnily enough at the peak of activity on this blog I documented the last beetles I really built (pictured here for proof!)
In my opinion Beetles are phenomenally easy to do, but hard to do well. The bar for entry is low because the construction is often so simple and component sourcing can now be done from a couple of catch all vendors. The material and hardware support is excellent and I'd push this as the starter class over antweights which are potentially harder for the uninitiated and more tightly competitive as a whole.
As with most contemporary robot combat vertical spinners are pretty widespread, though it's worth noting that hammer saws and regular overhead saws have notable representation too. What horizontal spinners there are seem to be BIG in terms of weapon mass, robot footprint and kinetic payload. From my cursory research of BBB championship competitions the chunk of the most competitive robots are the drive based lifters and flippers, noting the heavy reliance on control and the prevalence of durable plastic lances which I saw the starting point of back when Limpet won everything. I think universally all the modern beetles are packing serious drive power so while at the core of it all the combat is similar it's so much faster paced and more brutal that it's going to be fun to catch up.
The violent nature of me wanted to return with a bang, something heavy spun hard enough to cut a swathe through the field and hopefully fuck some hubmotors and fingertech beaters along the way. But instead I elected to return with a whimper with something much more passive and sedate. Not that I'm presumptuous enough to pretend it's an act of mercy "hey fuckos, I'm choosing not to build a robot that will beat everyone" Far from it. I simply don't want to have something not working properly making me look like a total cock. Never attribute to malice that which is adequately explained by cowardice!
This is MotherLoader (and yes I understand it should be lode but it is An Joke not a visit to geology corner)
I like Bite Force. Can you tell? Genuinely heavy inspiration from the season 1 BB champion has been taken as the initial spark for ML happened while the ABC years of Battlebots were streaming on Netflix. I ended up forcing my long suffering wife to sit through it and it turned out to be a nice little trip back to 2015 and she had a better understanding of what exactly I do when I run off to the spare room with an eBay package. Fun fact - the CAD model was named "beetleforce" until I settled on branding.
I wanted to keep it very simple because there's a lot less to go wrong. Obviously and if you try to do less but do it better you have less quirks or compromises and can make the bare minimum requirements for being a robot (i.e. not only does it turn on and move, it goes where you want it to and it can stay on for 3 minutes) Plus, driving skill is incredibly important with beetles and in order not to be overwhelmed I'm removing the reaction necessary for an active weapon. Some people are "aggressive" drivers, others consider themselves "precision" or "tactical". Personally I'm what's generally referred to as "fucking hopeless"
Overreaching with the scope of a weapon often just leads to it breaking or being rendered otherwise non functional. I'm going to stay in my lane for once and just play to my strengths.
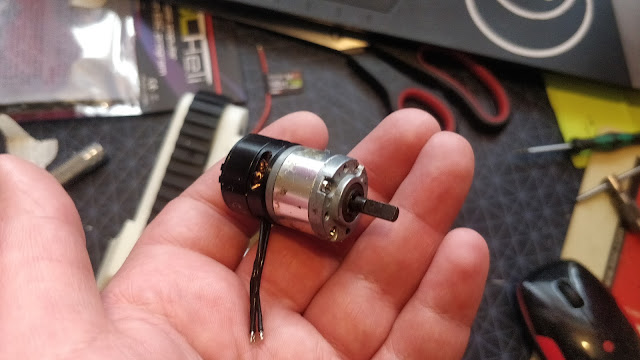
The core of this drive is fairly common albeit slightly shady in origin. With the old style 25mm spur gearmotors passing the torch, 19:1 22mm planetary gearboxes are seemingly the new bread and butter of beetles. To continue the gluten heavy metaphor, BBB produces a lovely meal deal sandwich version with an excellent motor pairing whereas mine are the equivalent of stale Wonderbread that had to be wrestled from a particularly aggressive duck.
Well it's not going in a smart car but they fit the bill for DIY robot! They are "Rotalink" branded items which pop up on all good surplus channels like eBay and AliExpress for incredibly small amounts of money. But the cheapness comes with a couple of downsides. These motors are second hand, and they are *very* second hand at that. In a slight deviation from traditional Chinese seller descriptions they are upfront about it and let you know they will turn up rusty and with a thin film of industrial grime and scraps of wire haphazardly soldered on. I don't know what they came out of but fuck me there are a lot of them with a variety of funktastic shapes on the output.
I mean fucking seriously, THIS is a product image they deemed appropriate? There is a fine line between honesty and insanity and I feel it rather blurs with every passing day.
Despite having lived a damp life with greasy gusto the motors themselves are in pretty decent nick with brushes and commutator not actually being that worn. Still, this really isn't much of an issue for robots because these things are going to have at maximum a 20 minute working life and they're going to hate every miserable second. They're mashed onto the gearboxes with some interesting low profile torx capheads which sit in mounting slots at a variety of jaunty angles casually approaching 90 degrees. The motor is kept concentric by its own boss interfacing with the mounting plate.
The real downside is the fucking plastic first stage which not only cut unit cost by 0.05 GBP but also deftly slashed my will to live. Handily enough both stages are the same so you just buy more and get spare motors, rings and carriers. It forces you into good habits in the pits as in order to use them you have to strip, inspect and reassemble with appropriate care and threadlock. I'd be drastically more cross if they didn't cost £1.70 each. You get your money's worth, put it that way. Many (sensibly) decide to chuck the stock motor and fit it out with a 1806 (or similar) brushless outrunner because this gives a faster and more powerful drivetrain which is more open to being tuned with firmware like Blheli. Not having touched Blheli in any great capacity since 2014 when brushless beetle drive was more experimental I elected to take the L, hedge my bets and stick with the stock motors. They're listed as 6-18v which you can average out and guess at them being 12v nominal. 4s Lipo (14.8v) is probably right in the happy zone of not being too anaemic but not crossing the line of screaming heat related death. It's also handily the upper limit of most easily available & suitable ESCs.
A casual example of what could have been
Now my wonderful friend Joey had sent me a lovely box of incredible delights, and included in it were some quite nice tracks that were slightly too large for an antweight but could potentially see use on a fairly compact beetle. I'm not sure if they're lego, online they seem to be visually similar so I'd have to buy some to check for sure. I drew up a drive sprocket, just matching the track pitch around a set diameter and printed some to see if it was a realistic centre distance. A couple of prototypes were needed to be satisfied but that's par for the course with me. I bank on getting things a little bit less wrong over a couple of trials instead of hoping for right first time.
The front sprockets mount to a steel hub which was another Shenzhen special, costing a whopping 32 pence each. I bought a bunch because it's always good to be able to mount shit to a 4mm shaft. I ran a tap through the holes for the 3mm holes on the flange. The sprockets have through holes which locate the hubs.
These are pinned one side with a countersunk bolt and grub screw access the other which is how power is transmitted.
"Hey that rear motor is well out of alignment"
Ten points for basic observation. In my endless quest for a pointless aesthetic quirk I like to have the end of the chassis end in a radius, matching the centre point of the drive wheel/track. This can sometimes prove a problem as it means fabricating a curved bum plate, often a handy bit of thick walled tube to go round the motors. I elected to indirectly drive the rear sprocket because it means I can run a dead shaft on the part most likely to be smacked by another robot. This means I'm less likely to shit the gearboxes to death every single fight and I get to have my cake and eat it in terms of the desired Biteforce look.
Initially I tried to draw up some thick spur gears but getting the centre distance to play out without obscuring geometry or adding an idler gear proved more trouble than it was worth. In the end I elected to draw a HTD3 pitch timing pulleys to take a hex mount to mount to the 4mm motor shaft and one drawn intothe damn sprocket.
I started out trying to use a Banebots 0.5" hex hub but I only had the one and it proved difficult and costly to track down another set, presumably because Banebots hate money. I continued my trials with this but ordered a handful of brass 12mm hex adaptors from AliExpress for £1.16 each for the final product.
I was quite pleased with the fit. The large side walls of the sprocket geometry keep it aligned but there are mounting holes in the pulley to mount flanges. The belts came from beltingonline and as is traditional, postage was the most expensive part. For 4 belts it was just under a tenner. I doubt I'll really need to change them unless the side is ripped open, by which point I'll have bigger problems.
As you can see it's really simple. I will keep these sprockets printed, because they'd have to be 2 part assemblies if they were milled too. My plan is to add flanges of a more substantial material just to keep it all together. Plus it's free(ish) to just pump out spares as I don't have to think about paying for machine time just raw material.
So here you get a better idea of the trial assembly. The rear sprocket drives have 8mm ball bearings pressed into them and they ride on an M6 shoulder bolt. This is 8mm of precision (ish) ground hardened steel - people use these for weapon shafts so I'm thinking they're going to be substantial enough for my transmission. They thread into a captive nut which feels like the strongest and simplest way of doing this. The nut will sit in a milled pocket, hopefully I've judged it tight enough to be pressed fitted and stay put. It works on the printed prototype but that's not accounting for a realistic tool radius when it's machined.
Well that segues easily into the intended construction of the robot. I'm a huge fan of flexibility and durability over hardness and stiffness with robots, especially when it's intended to just soak up the hits. With this in mind I went back to basics, wanting a thick plastic frame with decently thick metal armour on the front and on the sides to stop the plastic being gouged and thrown. HDPE is a fantastic material that ticks a lot of the necessary combat robot boxes. It's easy to work with, tough and fairly cheap and readily available. A UK robot without some form of HDPE somewhere is a rare bird indeed. Yanks seem to prefer UHMW which is a plastic in a similar vein often used in the same way. It has the benefit of being much tougher, slightly harder and more readily available for them. Over here (at least from the handful of plastic suppliers I frequent) it's not stocked in the same range of sizes and it costs anywhere between 2 and 3 times as much - and it's not noticeably three times as good on my uncalibrated Gut-feel-o-meter. Anyway, a rather important thing HDPE can't do is hold a thread worth a damn. You're limited to woodscrews (Ew, David) plastite screws (50% less Ew) or through bolting or nutstrip (barely Ew at all). I like being able to put proper torque on my fasteners after many years of wet noodley robots and I didn't want to pay for nut strip (plus my favoured metric source dried up years ago) so I had two choices, inserts of barrel nuts. If you've ever built shitty flatpack furniture you're almost certainly familiar with these!
For the uninitiated, inserts in this respect are little brass or steel fittings with a threaded bore and some form of interference geometry, like knurling or coarse threads on the outside for example. You're generally supposed to press, heat press or screw them into something soft like wood or plastic and, boom - you can stick a bolt into it. While these are undoubtedly the neater option and would be fine I guess, there isn't really all that much stopping them from pulling out or just stripping and rotating in place. Which, as the Law of Sod sadly dictates this would happen as soon as it's most inconvenient. I.e. during frantic repairs.
Barrel nuts are bulkier, uglier and heavier but are fantastically strong and are my go to for joining plastics. These just require a perpendicular hole in the panel they're mounted in and they're good to go. It's actually handy if you're designing a robot to be cut in 2d or 2.5d as you can have most of your located geometry on one plane.
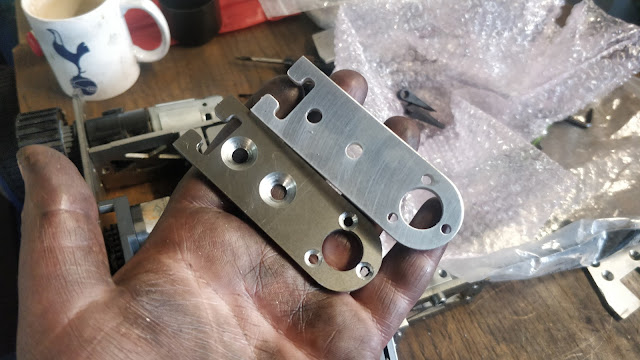
As you can see from this booty pic I've made rather drastic use of them, peppering them across all my panels. I'm going with the M4 flavour which has an outer diameter and a length of 8mm. These sit in 10mm panels. Generally you'd want to match the thickness of the sheet to the length of the nut but beggars can't be choosers and it's easier to be a little under than over. As a rule of thumb I always put 1x the material thickness between the nut and the edge. It will buckle and split the part before it fails, again by the time it does so much worse things will have happened. Crafty Harry's Penny Pinching Top Tip is don't buy these locally unless you're really up against it timewise. They're eyewateringly expensive. For no damn reason. A pack of five in UK stock is a few pence different to waiting a couple weeks for forty ones from China.
The chassis is as compact as I could realistically make it. It's small enough to be a pig to work on but not to be impossible. The plan is to pack out and populate the internals with foam and brackets to stop anything moving that shouldn't. Initially I wanted the armour is titanium plate, picked for lightness and overall toughness. A spinner will probably be able to make a bit of a mess of it but it won't be gut-spillingly fatal. However whilst I had a suitably sized chunk of the stuff, I wasn't able to access it due to complications of moving and generally defragging my robot junk. In the absence of doing it properly I elected to default to more pedestrian materials that I could count on any Lasercutter to have in stock. Because the robot was designed around the weight of titanium and weight was tight I did a mild power move and ordered the parts in both aluminium and stainless steel - one I could count on to be much lighter and one that would be the stronger of the two but much heavier at 7.99g/cm^3. It did cross my mind to thin the steel to find a more similar balance with weight but I tried to keep the different thicknesses on the order to a minimum
Happily chundering along now I had my shape, method and material, I reverted to type and began prototyping. Rapidly.
I elected to just hit print on my models and do a dry run of assembly. This would let me highlight any potential issues before committing financially to the parts and also let me play Pretend Robot Simulator. Two misshapen ABS birds, one slightly hollow stone. They're just churned out from the same filament as the sprockets and pulleys but at like 15% infill. It's the only ABS I care about, as I have a funny feeling based on touch, temp and smell that it's fairly pure ABS, no funky blends at play.
This went without issue bar one hole and I was pretty content to press forward. I figured I'd make some placeholder baseplate and wedge panels from sheet plastic then give it a physical test run. I was waiting on the post at this point, as I was moving out west but didn't yet have a fixed address and all my Chinese lead times would be landing in that awkward zone where it'll take too long to chance sending it to my current address and I'm not 100% where exactly I'll be living by then.
I took the bull by the horns and just specced out the components I could and made myself a shopping list. Speed controller wise I just went with the sensible option which was a 13A 4s capable ESC from Bristol Bot Builders. As many cheap robot ESC's are it had started life as a brushless controller and had been tricked into running brushed. I don't care, it's tiny!
It came with the centre wire still attached but I snipped it to limit bench testing cock ups. I will likely solder my own wires directly in the interest of saving space when I come to the final wire up.
It seems to be more of a thing in the UK to overspec batteries. Potentially because we indulge in more extracurricular bullshit fun like melees, last bot standing and so on that necessitate the ability to go back to back to back. Plopping in an 850mah pack just for a drive based robot hurts me (same person who once ran a 1.2ah pack in a drive all day with 4 25mm's) Going on some suitably Quick Mafs and a whole family bucket of gut feeling I determined that (assuming a punchy discharge rate) 300mah felt too small and anything higher than 500mah was a waste.
I lucked out thanks to Drone Bros. While the Bluetooth headphone/earphone market has fucking annihilated the availability of useful small Lipo cells for robots, Drone Bro's have hammered out a really impressive range of products that line up incredibly well with the demands of robot use. Generally speaking for a combat robot you want to dump a lot of current for a few minutes in the smallest possible space. This only tangibly lined up with the needs of the greater RC hobby world for whom greatest play time was a more pressing concern. Not that this is a bad thing - If I can only get 5-10 minutes out of a pack for an RC car I'm quickly going to be changing brands or chemistries.
Then drone racing became cool. Very cool. Where there was actually a huge booming market for high voltage, smaller capacity, eye wateringly high discharge (although some just seem like they discovered how to print bigger numbers) packs. Okay so they are basically marketed as energy drinks or e-liquid flavours with a horrific circus of tribal decals and garish 'cool' artworks, I can finally get a 4s 450mah 80c continuous battery off the shelf. I'm surprised I haven't seen one with a fucking supreme logo on it yet.
I originally wanted Tattu branded ones I found on AliExpress but they fell foul of the lead times and I don't have the best track record with shipping batteries from China in any sort of reasonable timeframe. Not to worry I found something locally with suspiciously identical dimensions and a welcomely plain label. The downside is I had to give Bezos some money but I'll have to learn to live with that vile blood on my hands.
I don't plan on putting the discharge to the test, but it's nice to have two packs as I'm potentially a little near the knuckle capacity wise. Oh and to make up for the sensible pack decals they came with horrible stickers, excellent!
I planned to use xt30 connectors throughout because I am not drawing a lot of current and in my prior experience they lock together pretty solidly.
Unfortunately this is the point where best laid plans began to unravel and I found myself suddenly facing a 160 mile commute to work (weekly, not daily thankfully) and a bit tighter in terms of time and money than I realistically wanted to be. I closed ranks a little and thought how best to proceed in order to not only produce something but still have fun doing so. I did consider pulling from the competition before it was even open but I knew if I didn't at least get something done I would just get further down the funk spiral of dead project limbo. With some encouragement from friends and a lot of "Harry it's twenty quid just buy it and stop being miserable you silly boy" care and support from my much better half I pressed on.
Gone was the HDPE chassis, cost and time were the main factors so I decided to crack out Charlie The Filament Monkey, tweak my design ever so slightly to be more print friendly and then just ship it. With a heady smell of ABS weighing carcinogenically in my lungs I declared "fuck it, we'll do it live"
One of the first tweaks was quite frankly, the icing on the nonsense cake. I had done what I'd set out not to do in terms of internal space and I had made it slightly too tight to work on without headaches or finger cramps so I did what any abnormal person would do and I put the controllers inside the bulkheads.
They're quite content in there, the AC is on, they have water and they are listening to their favourite music ( Switched On Bach -Wendy Carlos) Hiding fairly sensitive electronic components inside a structural member isn't the best thing to do, I doubt it even makes the list but it gained me enough space for foam padding the battery and it is relatively amusing. It also helped keep wire routing neater as I just had to run the main power to the middle and the signal and ground from the ESC's
I just transferred the transmission hardware over as I printed more bits. They're just solid ABS which is a totally risky move in a beetle (heck, its suspect in ants nowadays)
Also shown here are the HDPE flanges kindly cut by Ellis Ware, owner of Ranglebox and star of Chinese television. They are lasercut from 2mm sheet and just provide a nice low friction flange. Just like mother used to make.
Fixings and fastenings coming pretty much exclusively from GWR on ebay. You can see the barrel nuts are still being used and it was a really effective and solid way of holding the chassis together!
And here we see once again, Beetlemania taking over the map.. I was able to start testing the drive at this point and was pretty impressed. It was remarkably spritely on 4s and after a few teething issues (throwing tracks, shade and tantrums) I pressed on feeling quite confident I could make a robot actually move.
I had to submit a "Proof of mobility" test for the BBB event which is a fantastic trend that keeps everyone honest and on track and probably dramatically limits the amount of dribble on the day. The driving is a bit arse about face as I found my ch2 on the rx was dead so I had to quickly flip to Ch4 to get it going before I left for work and then missed the submission deadline.
One of the other major tweaks in the design moving over towards printed parts was the mechanical interlock between the print and the metal done with a fairly basic bit of puzzle piece geometry, some captive nuts (backside) and more mounting holes.
The side is held on by the main wedge, the standoff for the wedgelets and one additional M6 standoff. The shoulderbolt for the rear drive pulley just passes through and doesn't hold the back in compression at all, just a little shear as a treat.
I was really pretty happy with the shape and the overall vibe of the robot. It did feel like a spiritual successor to Loader while having those twinges of Biteforce and Biohazard I always seem to strive for. This was the point where all the parts inside my control had been done for the time being and I could sit back and wait for the shiny, spikey metal parts.
I had a little test drive again, much easier to control on single stick funnily enough.
Oh my! Christmas in February. My old faithful supplier of lasercutting came through once again. I keep going back to lasermaster because they are really very good in terms of cut quality and always super easy to deal with. They ended up only slightly cheaper than Fractory in the end but with a tighter turnaround and a known good is preferable to trying new vendors when you only have a couple weeks to spare. This contained all my stuff for the beetle, some panels for my FW project and some parts for Glow, another much more aggressive and refined beetle.
Very quickly I had the parts stacked up and pretend-o'd and I was fully living my tonka truck realness at long last.
Without too much arrogance I am really proud of this because not only does it look really rather fine the tolerances on the interlock were absolutely perfect. A little bit of guesswork on the tolerances for print vs laser parts and it was a beautiful fit. You needed a decent amount of pressure to slide it on but on it slid. Happy Harry right here.
I took a break from smugness to deal with absolute tedium. I wanted to increase my grip with foam rubber strips like I do on my antweights because whilst ugly and time consuming it works remarkably well for upping track, uh, traction. Ultimately this worked incredibly poorly in practice and left me with both egg and little bits of shitty foam on my face.
I countersunk and finished the side armour at work so there were no bolt heads to catch. Same goes for the wedge and the baseplate (2mm 316 stainless)
The wedge was also ground down to a sharp, nearly ground scraping point. Mostly done with an angle grinder and finished with a file.
Sitting pretty next to the robot that had some of the other parts in the cutting order. You get a single jelly baby if you recognise it.
The wedglet spikey bits got quickly buzzed with a grinder to tidy them up. You can see on the left the tips are at a bit of an angle as that's where the laser came to a point in thick material and just melted it away. I accounted for this so its just a quick clean up.
I think the final change and the most visually obvious from HDPE to print is the addition of these as yet unseen 2mm armour plates that sit on the side of my front wedge. With them being HDPE I sort of didn't mind them being these chunky ablative knockers (oo er vicar) as spinning weapons would just gash them and they would flex and deform and remain intact. Printed ABS, shock horror is not quite as resilient and would just split and delaminate, potentially writing off the whole panel if it starts to split along a layer line. These bolt to them with a veritable flurry of M3 screws and should buffer low to mid level attacks away.
Plus, they're pretty sexy too. Here also you can see the use of O rings as captive spacers for the wedgelets. They're tight enough to keep them aligned (and not fall off when I'm wiggling the panel around for repairs) but still compliant to have a small, controlled amount of squish. If you have uncontrolled squish please seek medical attention immediately.
You can see how they fit in here. +10 confidence booster to taking on horizontals. I suspect a decent vertical hit would probably remove them completely as at the end of the day it is just M3 screws threaded into ABS
So I needed to fill two requirements for UK combat. Fuse and removable link. As is popular I combined the two, soldering a length of fuse wire across the terminals of an xt30 connector. There is an O ring hung between them which you use to pull it out. Some people do zipties or tape but I like the little bit of stretch.
Round the back is where the link mounts, kept out of the way of most nasties. I was tempted by lid mounted but the saws and hammer saws scared me away and the amount of pre fight fussing about made me disinterested in mounting it in the base. Simple is good. There is an LED mounted in the centre of that panel to satisfy the power light requirement.
Here you get the idea with the link in, the latch down and the light on. It's a pretty neat system. I can say I did not have a single loss from the link falling out!
Now the competition was only a few days away and the bulk of the work was taken care of. I began doing all the little odd jobs like configurations. Here you can see the Heavy Armour setup. Lots of stainless with a hefty lid to buck away verticals and the overheads. I could have run like this as a default quite honestly but at full weight it was beginning to seem a little bogged down. Perhaps using drive motors less costly than a Wetherspoons pint was a less than stellar idea.
And here is the more standard pedestrian version with the plastic lid. I eventually ended up running this exclusively. Hey when somethings going well don't monkey with it.
As a sort of last ditch effort to stop me gettin got by any of the nasty verts I saw popping up I raided the bin at work and found some 6mm mystery plastic. At a guess I'd say it's HIPS but I can't be sure. It is being turned with the help of a file and some holesaws into a keepaway fork. Styled slightly to look like a big spanner it was just an idea to put something between my wedge and whirling death.
And that's what brings us to here. A touch of paint and some stickers and we're all set for a fun day out in Bristol! I have my standard setup the heavy duty lid and a super thick plastic lid designed to run without my top forks for maximum overhead defence. Fighting a traditional horizontal or a crusher. Then there's the aforementioned pokey stick which could be swapped out with all setups and make weight but it would no longer be invertible with the thickest lid.
Never one to resist the opportunity for a stupid joke I modified these signs I picked out of the works bin to make it more applicable.
Luckily I didn't have to use this. Otherwise I would have looked like a dick.
It is now about 7am on the day of the competition and I am being the second most irritating passenger on This Great Western Railway Service by taking up a table in order to disassemble my toy robot. The gold medal for early morning irritation went to a 9 strong regiment of middle class women who were having a prosecco fuelled nightmare bitching session about anyone they knew who wasn't currently present. At length. At volume. I admire the commitment to the session, even if it did involve flavours of Bacardi I didn't know existed.
I was taking it apart out of mild paranoia - one side seemed to want to bind in a certain position which isn't good. My worst case was the plastic gearbox stage had shattered in one of them, likely the front as that's under the most load. I stripped and reassembled as best as I could on the train and the problem went away with no obvious cause. I later learned that it was a bent shim that would trace one slightly proud countersunk head on the flange that would catch every so often and be the cause of the jam. The only thing I noticed was a drive belt was a little worn one side so just swapped it out for paranoia's sake. This eventually helped me out quite a lot!
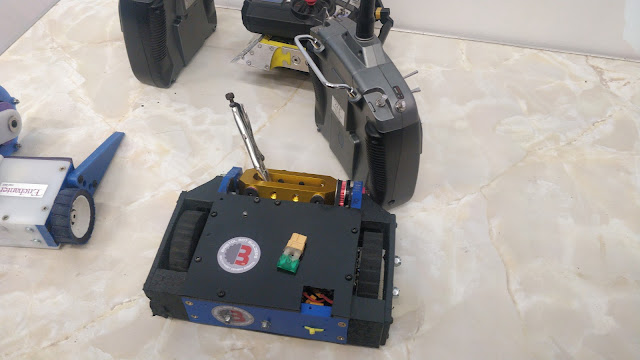
Pit bench photo courtesy of Harry Tee who was kind enough to snap one before it got all dinked. Really quite proud here. Concept executed, project seen though. I had quite a nice buzz after it was through tech check and could have a coffee and a dubious vegetarian sausage roll before it all started.
Pit benches were assigned in pairs and my benchmate for the day was Rory, a fellow cultured track enthusiast although he had the slight upper hand as he'd seen the obsession through to featherweight levels. He is a fantastic engineer and had brought this really beautiful undercutter which was equal parts fearsome and impressive. It managed to capture exactly what I was trying to go for in my imagining of Simon Harrisons Battlebots application.
Anyway, it was ranking pretty high on robots I don't want to fight so naturally it was my first draw. Bugger. They were 3 way melees, also in attendance was another 3D printed robot from another Harry - strange!
I waited to load in and took stock of my chances while having a nose at how others were fairing in the arena,
Quite similar in intent was the 4wd lifter but it seemed to already be delaminating before it was in the arena. Shamefully I hatched a plan to play it cautious before finding a moment to throw my wedgey brethren to the lions and try and stop the undercutter by pushing this into it...
Well now.
That's the price of hubris I suppose! Yes it did not go particularly well for me in that fight. I think I was too cagey and too inexperienced with the robot and how to actually fight robots! All plans to be cautious were out the window as I leaped out and wedged Let's Dance on the side before having to panic and defend against the now spun up Mini Spiny. I found myself easily outflanked by the quicker robot and within a deft motion he had given me a whack on the side and folded my wedgelets under, bending them into the track surface. Later I realised he had smashed the standoff they were mounted to also. Now a bit gimped in terms of mobility and wedgeability I just sort of hobbled awkwardly until further blows snipped my track and I was counted out. Not a particularly great showing but it got me back into the swing of things and was a good humbling against modern beetles.
I had a little kiss on the rear where it nipped under and cut the track. It also mushroomed the HDPE flange but not beyond a bit of knife work.
Two large gashes in the side and a really sharp splinter on the bottom of the side plate which I quickly cut my hand on. These are mostly cosmetic and with a file and some elbow grease they were hammered back to service.
This is basically an exit wound, from where he pulled out the standoff. Quite happy it wasn't ripped off and instead bent. This was bent back with a bit of brute force and ignorance. So yes, quite a rocky start. With what I know now I think I could have had a serviceable chance of bringing it to a judges decision had I run without wedgelets and not hesitated or tried to play games. Keeping on the spinner as an irritant and trying to milk aggression points is an (almost) winning strategy, but more on that later...
So while the bent and buckled armour wasn't the end of the world. A bit of handy work with some pliers and a file sorted that the track was a bit more of an issue. I didn't bring spares because, well. Just Gonna Send It and I didn't have enough foam to prep other tracks. Luckily my goblin brain ratcheted into gear and the big bottle of superglue came out. I put the glue along the join and kept pressure on it, getting only a small amount of my fingerprints, DNA and soul stuck to the fancy black rubber band. To make it as strong as I could as I snipped a length of the old timing belt off and glued it along the joint. I did this on both sides of the track. Somehow this held for the rest of the competition. I'm glad I took my robot apart on the train now, I don't know if I could have justified chopping out a new belt.
I felt pretty on the back foot coming into this fight as I didn't have quite as much time to prepare as I would have liked. I was drawn up against another printed bot, though this was much tougher in nylon. AtLongLast is the first beetle from Peter Waller, one of the living legends of UK combat. He has been instrumental in pushing the 150g class along almost since its inception with legions of nasty spinners and fantastic mechanisms. His combination RX/ESC units powered pretty much all of the top spec antweights at one stage.
As I had no fear of damage and quite a lot of worry about my hasty track repair breaking and leaving me stranded I elected to just go for it and try and keep bothering away at him. Very quickly I found that I couldn't get under the front but his lifter didn't seem to be able to get under me either. As he began to lift I could just drive over the top of his robot and land right side up. At a stalemate both of us tried a sort of twirling dance of trying to get round the side. The good part about tracks is it does tend to eliminate oversteer to a point so I had this as a distinct advantage. Our robots and driving abilities were evenly matched. I found going in directly from the back worked quite well and I could push and pin. Once the pit was active I dropped the tussle and went straight for the button, trying to show some form of control and planning to the judges. Returning to the slog I was trying to tease Peter into lifting, knowing I could dart in and use that to my advantage with the push but he remained cagey. In the last moments of the fight he lifted and I came in at an angle instead of straight on and he had my track clamped. As the countdown happened I could just ram forward and reverse to show motion and do little else.
Amusingly the judges had to let the next fight run while they came to a decision. I assume they needed something to wake themselves up after the cold war for traction they'd just witnessed. It was a difficult one to call and I would have probably accepted going either way but on a split decision I just pulled past the post. MotherLoader had won a fight!
My next opponent was a really chunky spinner called Oubley sporting a fingertech beater and built by the worlds friendliest man. This was absolutely a more formidable robot with the potential to do a lot of damage quite quickly and effortlessly to something as functionally delicate as MotherLoader.
I knew that driving aggressively and flat out worked and made the robot feel pretty good to drive. Thinking logically I wanted to avoid ramming or catching an edge because that would increase his bite and I would be thrown around like a ragdoll. That's how these drums and beaters get you. They will wear you down with little detriment to themselves. If I kept my wedge firmly planted in his weapon and tried to control the direction from there I shouldn't come away too badly....
Ah. I see.
Rather more battered but still in one piece here. The fight went the distance which was a surprise to all as Oubley tends to place quite highly on the podium. From the start we met head on with a grinding noise from the beater but no bang. Good news for me I could successfully hold him off. However the speed advantage was certainly with him and he would easily outflank me. After the first few engagements he caught my top spikes and threw me flat across the arena. I recovered and went on to have him pushed into a corner. I was almost playing catch and release for a while because given any space he could use his speed and agility to nip out from my control. Boxed in it was going remarkably well for me so far until I made a very poor judgement. When the pit became active I immediately relented my pushy assault and tried to go for the button but as I lined up Oubley had come out swinging and he clipped the back of me, throwing me perilously close to the OOTA zone. This also hobbled the track a little, meaning I almost had to rock that side into forward motion. Returning to my tactic of corner pinning worked for a moment before a calculated hit from Oubley chucked me over onto my back - a first for me in the competition as remarked by the commentators. Luckily for me, the weapon on Oubley had bent my top forks up in such a way that I still had a good amount of control inverted, as it pushed the back down further. After a few seconds getting used to my new orientation I was able to shove my wedge back into the beater inverted with the hopes I could ride up and be turned back over. The Gods of Nonsense answered my prayers and this worked, getting me back up and truckin' managing to head right back to the illusive pit button in a startling moment of driver intuition. While the last moments of the fight slipped away I suffered two more hits to the rear of the robot but was able to keep surviving trying to get some semblance of control back. After a final stalemate of grinding his beater across my wedge cease was called.
Once again I made the judging panel earn their tea and flapjacks for the day as it took for the next fight to be played out as we waited for a decision. The sliders came out as they tried to quantify what they had seen and both robots were taken in for inspection. Another split decision came down the line and to nobodies great surprise it was for Oubley! Though obviously disappointed to be out I was glad that I'd had a proper outing and faced off against some really impressive opponents and it was a great base to work on for the future. To soften the blow Oubley went on to take second, narrowly missing out on the crown. Really hardy little robot and I can't wait to have another crack at it!
Lots of very deep gouging and scratching going on here. Interestingly he mowed a lot of the heads off the bolts, leaving the wedge floppy and unsupported. I'm amazed it stayed on with 50% of the bolts missing. Honestly the prints were incredibly secure considering they're no fancy material and right at the forefront of abuse. I lost chunks for sure, the photos above show this but they broke in a controlled )(ish) manner and they didn't write off the whole part from one little nick. This is good to know going forward.
So there we go! I learned a lot from this and had a very good time with it all. I'm still getting back in step with things and meeting new people but it was super wholesome the amount of people who had seen and liked my little yellow disaster. It was fantastic to see so much design flair and simple effectiveness on show too. I'm really proud to be in the same competition as some of the robots and builders on show at BBB. Just good vibes, plain and simple.
This version of MotherLoader is going to be put out to pasture I think. A 1:2 W/L and an award for 'Most Original Entry' (that I went home before being awarded - ope) is a great legacy and something to build on but I has helped put some pots on the boil and I can move on to weirder and track-ier things.
Thank you if you made it this far, even just scrolling down is a bit of a task when there's this much fluff and nonsense on a page it is appreciated.
For photo dumps, more constant wittering and general nonsense I can be found here - The stream for the event can be found here - The raw fights are here (5 hours shorter) - Link to the amazing BBB
Any questions, comments and so on feel free to pop them anywhere but the Harry Makes Things FB page is the most likely to get a response.
Take care now, it'll only be another 6 years until the next update. Set a reminder on your phone or something.


No comments:
Post a Comment