Following on from my tepid return to the beetle scene I made another robot in the same vein as MotherLoader. I set out with the best intentions. Take what I learned from the last outing and apply it to a new build which would yield a better performance and justify my nasty habit of building a whole robot and throwing it to the wolves under the guise of R&D.

Now, I tend not to measure my success by the standard Robo-yardstick (y’know, winning fights) because that would just mean I spend valuable build time crying in the foetal position. Instead I go by how far I can push a silly idea uphill and just physically get the shape in my mind into the arena. It’s easier on the soul this way.
Bearing this in mind, would I deem MotherLoader MK2 a success by my low, low bar?
No, absolutely not.
I did not come away with a warm fuzzy feeling as I did with the first ML. There isn’t a brilliant fizz of ideas and excitement either. There is instead a grim determination to Do Better and a long list of foundations to shore up.
Coming back to the beginning I set out to make something grand and interesting. I wanted to make a really neat light central chassis where I could bolt in weapon modules. Cool eh? I thought so and started with the drive. I needed something small, light and powerful. All things synonymous with brushless motors. I had a little experiment on the last one but nixxed it in favour of ‘ole faithful stock brushed. Way back in 2014/15 I had a crack at brushless drive before it was cool. I actually used some old motors that have been rattling around in my parts bin since then. Brave perhaps but waste not want not. I have fleeting green moments where I’ll attempt to recycle everything, even at detriment. A small slice of 90’s Robot Wars mindset I suppose, use whatever you have lying around!

I picked up some of these dual gear 25mm gearmotors that seem popular with those not in the planetary club. These were insanely cheap and built like a fucking sewing machine inside - I don’t get why some people turn their noses up at them.

A small, nondescript amount of fudging had the old SK3’s stripped and a new shaft cut and pressed in. I just locited the pinion on and peened the end of the shaft over. A little bit shady considering some people have to resort to acid flux and silver solder but I actually didn’t have any problems with slippage.

The weight difference between a brushless unit and just the bare motor is incredible. I scoured aliexpress for the cheapest possible BLheli32 ESC’s and these “readytosky” 35a units came up trumps. They ran about a tenner each with tax and shipping.


Giving a nod to its predecessor I elected to house the ESC’s in pockets where they sat snuggly in the printed bulkhead. Space was going to be tight as I wanted to fit a whole robot drive system into a slim horseshoe shape to leave the middle empty for modules.

I really liked how effective (and cheap) captive nuts were in the previous version so I carried this forward to this version. I just made sure they were a relatively tight fit in the plastic and they worked great! These ones are M6 for the 8mm shoulder bolts I was using as driveshafts.

Here was an oddball experiment that made sense at the time but did not get carried past a couple early versions. I was a little wary of having only one trackwheel driven, as MK1 had two motors per side driving the track. My worry stemmed from the track having greater inclination to bunch up, twist or warp when only pushed along from the back instead of pushed and pulled by two driving pulleys. These spur gears gave an artificial drive (no added colours or flavourings though) to the front pulley so it would behave similarly to a known good system. That was the theory. The practical reality meant it just added a lot of complexity to setup that really didn’t require it and the added friction of PRINTED PARTS ON PRINTED PARTS ON PRINTED PARTS (on shitty bearings on bolt shafts) just made it an amp suckin’ mess. I don’t feel it's an inherently bad idea just poorly executed working under my constraints.

I was making great use of my new Ender 3 v2 printer for quick and easy prototypes in PLA by this point. I'm sure you can tell by the vibrant filament choices. Below you can see the neat little retaining clip that holds the ESC down and guides the wires too. Functionally identical to a ziptie but a little fancier. Barrel nuts are also starting to come into play now! You can see a test clip here

My first set of custom tracks makes an appearance now. These were an experiment in material reaction and technique and while it really failed to make anything other than a floppy desk novelty I class it as a relative success.

This is pure silicone rubber cast into a 3d printed mould. The profile itself is really simple. It’s just a HTD5 belt with some knobbly bits on. I made my drive pulleys a sensible size, found a centre distance that worked and made myself a belt to fit.


On the plus side it was incredibly grippy, but being so pliant was a downside that wasn’t entirely unforeseen. It would flex and flap a lot, wanting to ride off the pulleys almost immediately. Something better would have to be done, and it was. I shall go into more detail shortly.

The frame for the modular weapons was trailed out in some funktastic rainbow PLA (the absolute cheapest) It is sporting two 800mah 2s packs shoehorned in there to give it some guts. It was also pleasingly symmetrical at this point.

The first module I experimented with was a quick 'n dirty axe. Now there is absolutely no point building an axe in the beetle class because I do not believe they can ever cause meaningful damage. I have intentionally worded that rather prickishly to try and provoke videos of nasty axes being thrown my way and more builds! Better living through incendiary comments.

I dug out one of my old Rotolink nightmares from the V1's drive and paired it with an shorter can SK3 of the same vintage that I am using for drive.

Slapping on a lot of extra reduction seemed to be the way to go in order to keep it controllable and have enough torque to reliably self right. This are custom gears printed in ABS. The first stage is Mod1 which steps up to Mod 1.25 for the second. The axe mount is also built into the final gear.

Before I move on too much more I will just touch on the drive pulleys. They are a standard printed affair with a recess for the spur gear profile and they have the same thin profile 8mm ball bearings as the last version. These in turn run on shoulder bolt shafts which double up as a sort of pin and mount for the outer armour.

I tried to keep the classic 'Loader' look going as I feel that profile works really well to buffer damage and contain it to the front of the robot. It was at this point (with only one module built I add!) I gave up on the multiple weapon idea. While it is something I would absolutely adore to revisit at some point it wasn't exactly gelling right and I was struggling. In the face of ripping it all up and starting from scratch I made the decision to modify what I had and build in the axe setup. I just pulled the geometry I needed off the module and stuck it on to the overall shape I was running with. It was surprisingly effective.

I ran out some test frame parts in PLA (incidentally the right colour now). Now that I didn't have to accommodate the module interlocking geometry I could cut a good chunk of width out of the robot as a whole and it only ended up a few millimetres wider than the V1.

Now that I had my shape, I discovered I could slip one of the 450mah 4s packs I had left over down one side, leaving the other wise free to have the gear mechanism for the axe and the RX/BEC rats nest.

I printed up the axe gears in some of my favoured ABS blend in a more fitting colour. With the benefit of hindsight I might call ABS too soft for gearsets of this nature in future and might tend towards PLA plus or ST, perhaps even a nylon of some description would be more suitable. Makers Muse did an excellent video showing off the best materials for printing gears. I may well take heed next time. They didn't not work however, though the thinner Mod 1 running on the steel pinion was showing some deformation.

After this I cracked out the Ender and a spool of incredibly cheap TPU filament. TPU is the hot new wonder material for anyone who likes a bit of wobble in their life. It has absolutely remarkable elastic properties and will bend and deform am incredible amount before returning back to shape. People have been using it for a while now and I finally got it together enough to give it a whirl and I am really impressed.

The frame is stiff enough to actually function as a frame but still really flexible. I loved that I could put as much pressure on parts as I could with my hands and have them spring back. It was easily twice, perhaps 3 times more flexible than HDPE which is already pretty ductile. It leant itself really well to my practice of barrel nutting and using through holes and captive nuts to attach panels. I printed them with a 4mm wall and a 25% infill which got me a part on par with ABS/HDPE in terms of weight but without compromising on strength. I did have some under extrusion issues however and some of my print quality wasn't stellar. I attribute some of this to my lack of experience with both the material and printer and fairly damp filament. I noticed the more time went on, the worse some of my problems got. I gave it a quick dry in the oven and it reduced the imperfections but they weren't gone.
It was at this point I turned my attention back to the drive system, focusing on the tracks. King of the antweight class, Mr Peter Waller has had really good success with composite tracks in his 150g robots. He prints a flexible core with super soft silicone cast around it. I saw no reason why this wouldn't scale with a bit of modification

First off I returned to my drive pulley models. I completely removed the stupid spur gear string that was strangling and stressing my drive out. As the motor sits offset inside the frame in one of my signatures (aping off Biteforce yet again) It does require an indirect drive to the pulley. I stuck with spur gears for this, printing myself a Mod1 pinion and drawing another spur gear onto the HTD5mm pitch pulley. These rear ones are a 2 part affair, as picking all the support out from under that final flange was hellish and unfortunately lead to the gear profile being sloppy with bits of plastic hiding like plaque between the teeth. I pinned the flange on with lengths of brass wire and glued the assembly together. A solution to a problem that doesn't need to exist - totally on brand for me!

Donated to my efforts by Tom from Bakerbots was some really flexible TPU. It was free, the right hardness for my needs and right in front of me. The only downside was the colour. Used to make puppet parts in another life it was a rather off-putting fleshy beigey colour. Oh well, needs must!

I knocked up a rough belt profile to see if it would work as I required to and I was really lucky. It was perfect! The right amount of squash and stretch. Again I did the hand strength tension testing and couldn't break it.

I quickly added some geometry to the model to give the silicone something to form around and interlock to in the form of some bands and increased gaps. I ended up using a pretty special method to fill the moulds in the end. It was a mixture of using a syringe to inject silicone around the edges and then a sharpened pokey bit of wire to feed and pull silicone through the loops. What I was afraid of was they were just going to catch bubbles and leave cavities devoid of any actual silicone so I wouldn't get the benefit of the added latching. It would be more sensible to have a vacuum chamber, but I did all right with a pokey stick. The mould is just ABS and the silicone is the same as I use for my moulds, 25a shore from Easycomposites.


I quickly pumped out a second to see how it would go and left to go see Tiger 131 run at the Tank Museum while it cured. Hey, I'm nothing if not committed to the track life aesthetic. I picked up some lovely beers while there (I'm a sucker for that sort of thing)


Here was a brief segue back to the interchangeable weapons idea. Instead of having plug in modules I wondered if I could skate by just by having different waggly things tagged off the output of the weapon. Could my healthy reduction on the axe be enough for a lifter? The maths said "maybe" so I started to have a go with a trial lifting arm with a grabby hook setup tipped to follow. In the end I decided not to pursue this much further as it would have taken time I didn't have to fuck around with things I couldn't be sure would be helpful.

I printed another axe in a more suitable colour of PLA while I waited for the laser cut Hardox version to arrive. It was starting to look like a robot!

As it was reaching the later stages I began hunkering down to start cracking out the wiring loom and making armour. Unfortunately disaster struck as I tried to pull up my batteries from storage charge. No connection. Huh? Well shit, the tab on the positive output had somehow fractured. Anyone who's had this misfortune before knows well there is nothing that will let you solder to a lipo cell tab that hasn't already been tinned. If this was an antweight I'd junk the cell but I had no other viable batteries so I had to bodge it. I built up a connection using wire wrapped tight around the remaining stub and held the assembly together with adhesive. Test yanking the cables didn't cause any loss of connection and it charged okay so I ran with it. Ultimately I think this played a part in the downfall and I can chalk it up to experience: Don't Do Shady Shit.


I marked out the shape on the plastic itself with a combination set and a knife blade. There was a little bit of vernier scribing to get my hole placements too. I scored the HDPE deeply enough that I could split it along the cut line then come in and finish it with the plane. I loved this method and will absolutely try and use it again.

The idea behind going for HDPE as a fairly integral part of the structure is to keep with the theme of wobbliness. I wanted to just absorb impacts as much as possible and come back from them. This said I was planning to have an aluminium plate on the front for facing spinners, especially Fingertech beaters as 4mm aluminium at a 45 degree angle seemed to work really well for just soaking up damage without letting the weapon dig in too far. I also cast a new pair of tracks, this time printed in white TPU of the same shore and black pigment added to the silicone.

Now children, this is how we desecrate a corpse. Yes I finally needed to crack MotherLoader V1 open to steal some metal gears for the weapon on V2. Those painfully cheap Rotolink 22mm only have 1 metal stage so I thought I'd best nab some so the axe didn't become too sad too soon. As I can't see it ever running again other than "hey it turns on!" funnies and historical value it can have all plastic gearboxes without harm done.

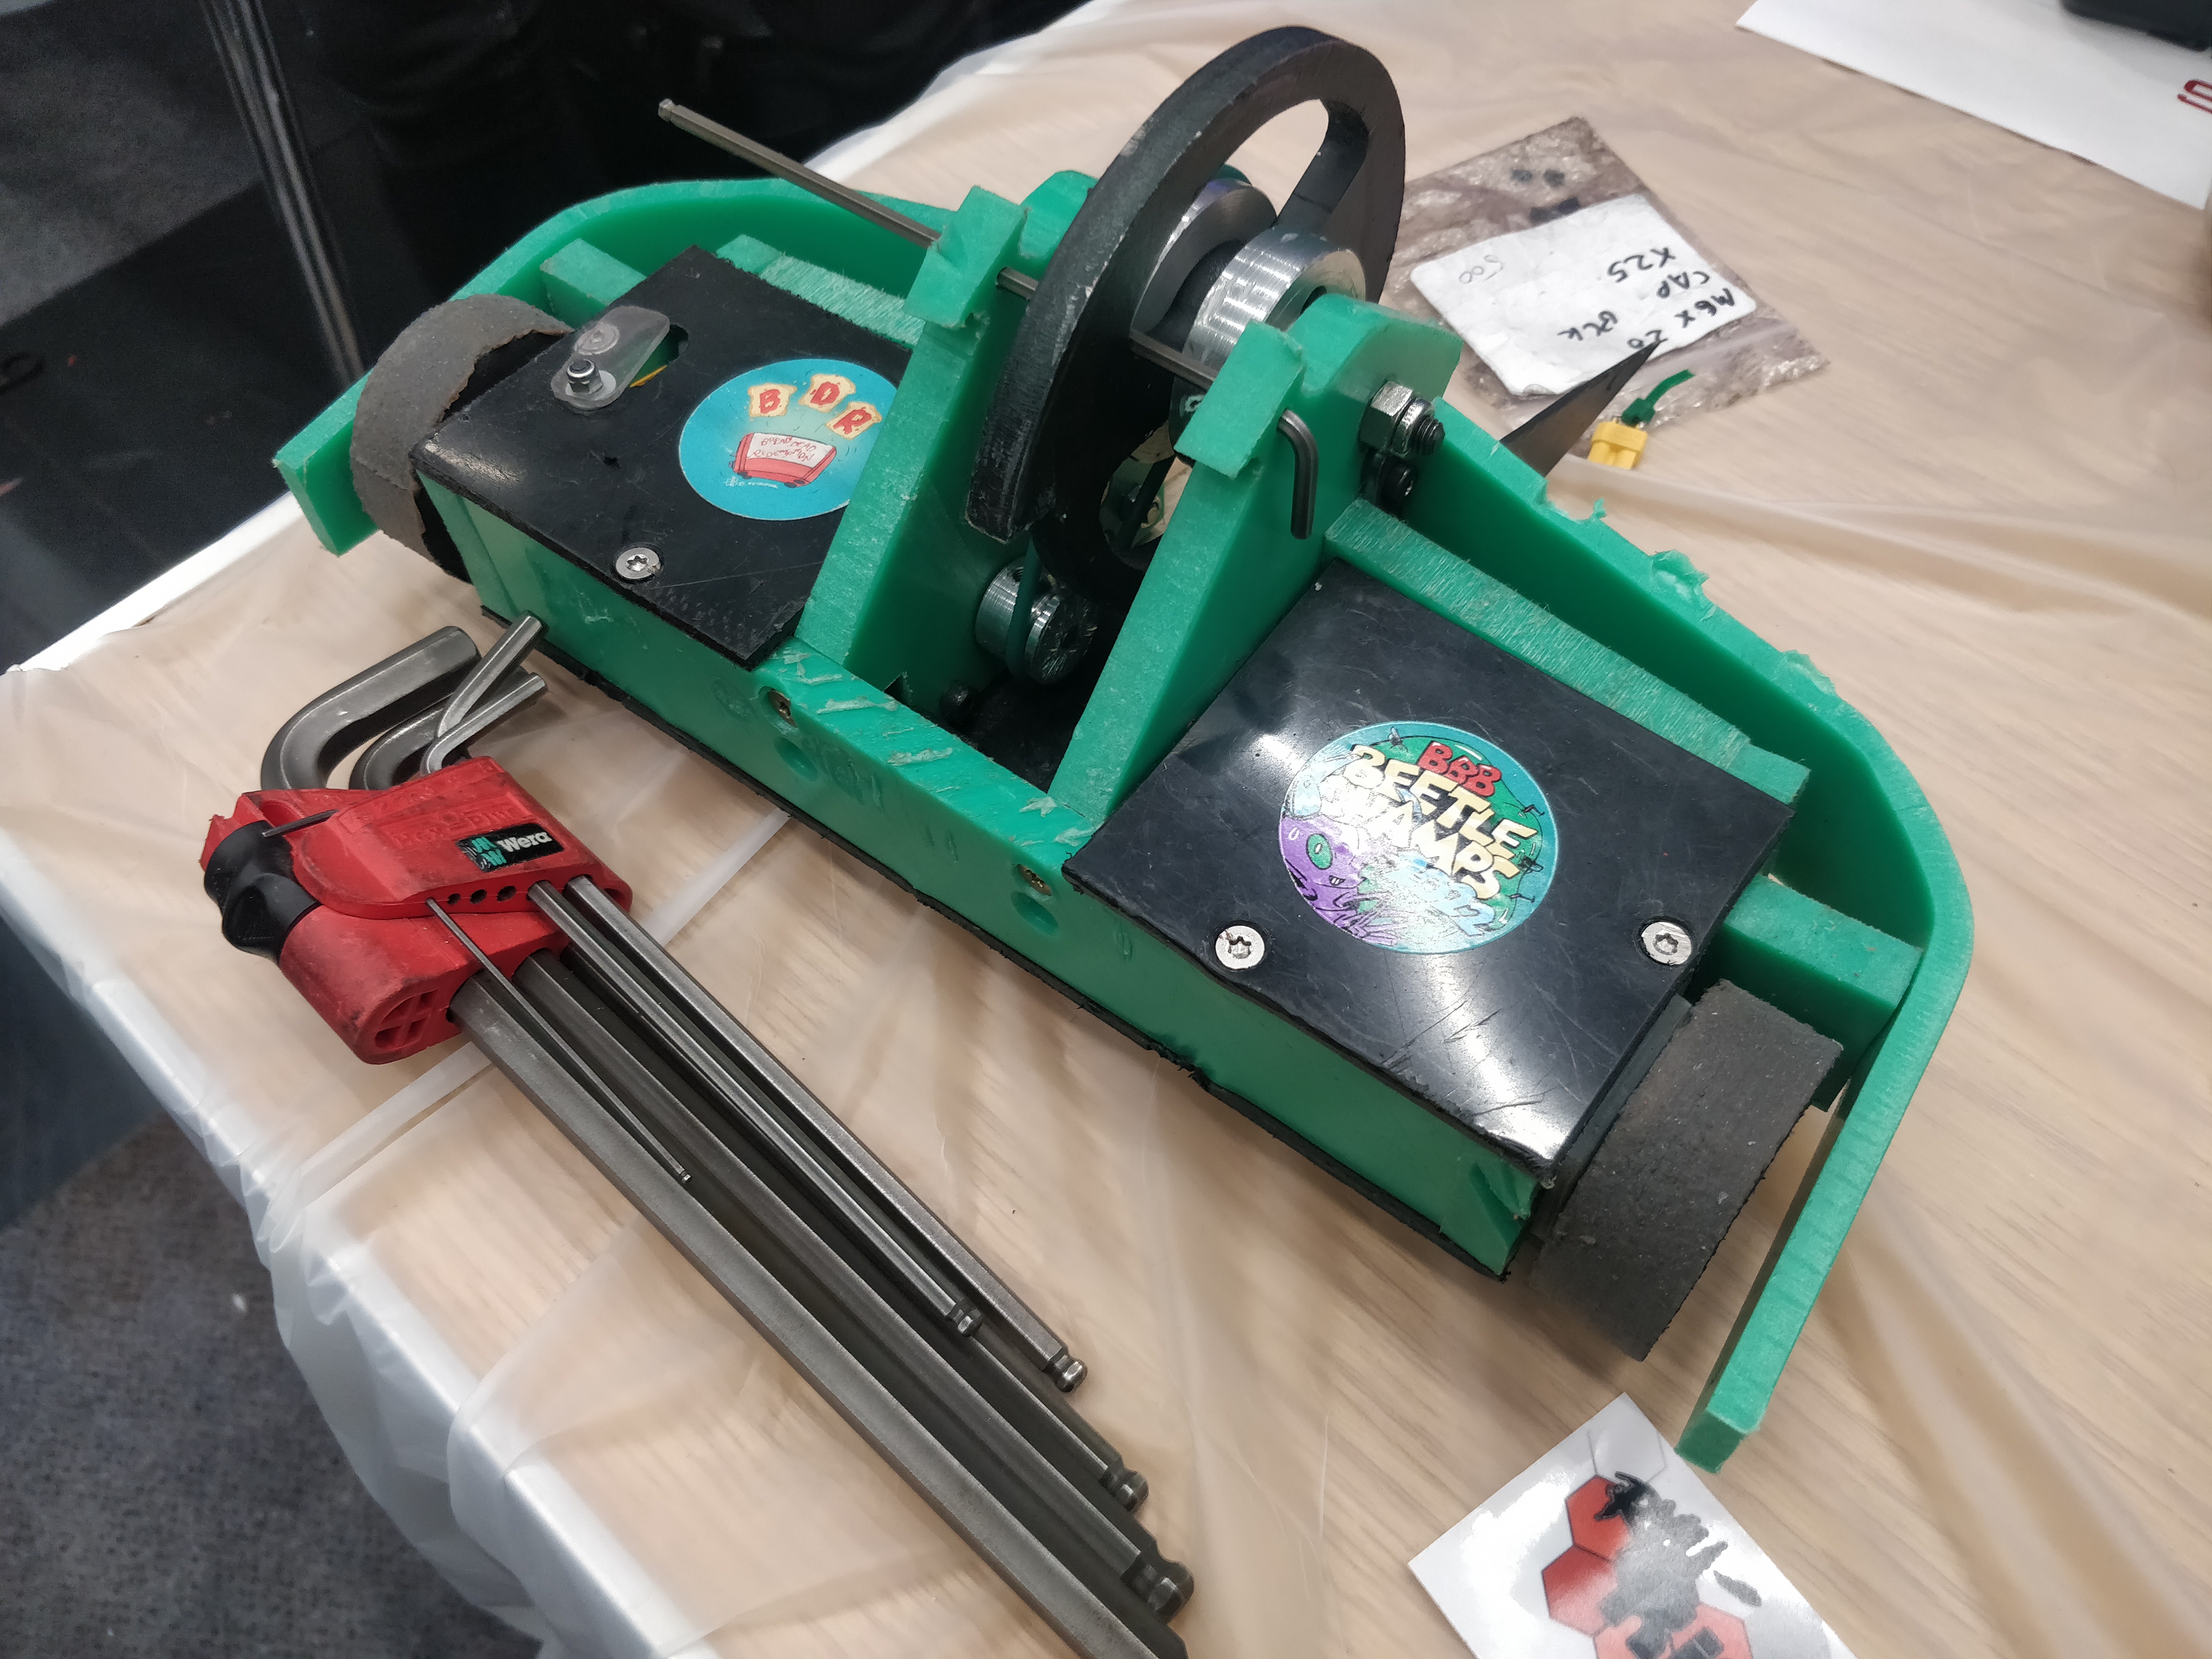
The final wire up and (dis)assembly had begun. here you can see the removable link and power mount which is just the kit from BBB mounted up onto a printed back plate. This was made from ABS for simplicities sake and is pretty much the only non TPU print in the frame.

The weapon motor fits through the bulkheads on a printed plate so it just pushes through. The ESC for that is also mounted in a recess in the bulkhead.

A very cheap Chinese pinion gear was part of the assembly. It was amusingly long (what it lacks in hardness it makes up for in length) so it had a meeting with a Dremel before assembly.

Once chopped it was able to be mounted. One bonus to the gear aside from the price tag was the double grubscrews. Less good is the fact due to the lack of boss its been rammed through the teeth, nuking the useful surface.

At this point the lasercutting turned up! I had some antweight bars and discs cut, alongside the obvious axes.

The front is the 4mm plate of aluminium I mentioned before. It has no wedging duties (saved that for the HDPE) So it was just there for ablative mass, bulking out the front 10mm thick where the nasties would hit it.

And this is where I start beginning to call last orders on Motherloader. The front is mounted, it has all the required safety bits (heck I even got ahead of myself and built in a locking bar - thanks me, you're the best!) Once again I became really pleased with the Tonka Truck-ness of it all. It was a very pleasant thing to have in the hands. Aided no doubt by the twist and shake that the more fluid frame and materials gave it. I would have no qualms launching it off the balcony and into the back garden of the chip shop below. A good sign for combat? Or perhaps just some unresolved personal issues.

The swing of the axe is intentionally limited also. Loose theory is that if left fired it is more use at beetle-waist height as a sort of flailing hook rather than fully fired into the floor lifting the tips of the wedge up. A sort of half thought through funny really. It was ultimately irrelevant.

Just showing off how brightly the arse of my robot lights up when you turn it on. Like some sort of insane firefly.


I made the lid out of some more 3mm HDPE, same as the baseplate with the Stanley knife and plane method. Unable to help myself I decorated the lid with some old stickers from where I used to work. Juvenile I know, but one simply must have those "anger Volts"

Plonking the robot on the scale the night before the competition was perhaps bit of a chad move. However, it was all perfectly fine as I was sailing clean under the American beetle limit (3lb) and drifting several nautical miles from the balmy shores of the UK ruleset (1.5kg) This gives me a good indication of where I can better stick weight next time - hey, there might even be enough for a Fingertech beater. Shame they don't come in yellow. And that was that for the build! I paced this one better I think, more time wouldn't have really helped the problems that befell the robot. Well maybe months would have, but I wasn't crying out for a few extra weeks days or hours to twiddle around. I had a goal and managed to meet it in style with a lot of shit thrown at the wall and prototyping pushed out of the way early on. Parts got to be ordered and tested in good time, rejected or carried through to the final bot and that's no mean feat! I feel like I am cutting my losses from the word go sometimes but I have found constantly taking the path of least resistance (while staying true to the design vision) helps me to finish instead of chasing my tail moving goalposts.

I trundled on over to Bristol once again to push this thing through combat! As BBB is hugely well organised it had assigned pit benches and I was set up next to the formidable and impressive Luchador! This was the third version I think and it was probably one of the most aggressive non spinners going.

My first draw was pretty good, I had Angel slice which was a Mr Kippling themed (yes) horizontal spinner. And let me tell you, it is exceedingly good all right. It has had a big improvement in terms of spin up times and overall robustness it seems. It was going to be tough.

Speaking of tough, as it was a 3 way melee for the first round I had to face off against the ever present arena marshal extraordinaire, Mr David Weston and his robot Lilith. This was the less obviously dangerous robot but it was low, powerful and quick. It was everything that MotherLoader wasn't.

Thankfully I came away almost completely unscathed due to Dave quickly dispatching Angel Slice with a neat stack in the corner with ML providing a wobbly assist and anaemic love bite with the axe.


The power side of things was also very disappointing. I would assume on a good day they'd supply the current more than adequately but they were having the worst days imaginable. I think they were a bit shagged after months of neglect and the broken tab was just the shit icing on the arse cake. They will be relegated to desk duty then inevitably the bin. I have the weight for something a bit beefier so I might up the capacity a little to give me more grunt. Size is a bigger issue but I'll burn that bridge when I get to it.
The weapon fell foul of the same issues with motion as the drive, just slightly more obviously so as it was hard not to seem like a total wet blanket. This mechanism will be completely rethought and I have some painfully silly solutions to trivial problems. I can safely say I will not be revisiting the pod/module idea for a new version.
The Good:
Tracks were wonderful, it was a great benchmark to go forward and play around with traction patterns and all sorts of interesting miscellany there. It's relatively cheap to experiment so the world is my oyster.
I was also very pleased with the shape of it all. Not only was it fairly pleasing and a relative signature look for me now it worked well defensively. The construction method was solid and reliable, even with the transition to flexible filament. I would love to find a more rigid material to print with as it would be nice to have some solid parts. Maybe it is time I popped my nylon or CF infused cherry.
Luckily there are a few months of long winter nights to percolate and otherwise dick around with ideas before the next BBB competition in February happens. Watch this space for another yellow wobbly disaster trundling ever onward.
Until next time, Space Cadets.
Peace xo.
No comments:
Post a Comment